
Following week 3 I had a lot of question about how you build Applications and Visualizations on top of BigQuery. With DBT the whole process is now becoming clear. I have to say I really enjoyed this week although there is a lot of things to learn which can only be achieved in real-world problems.
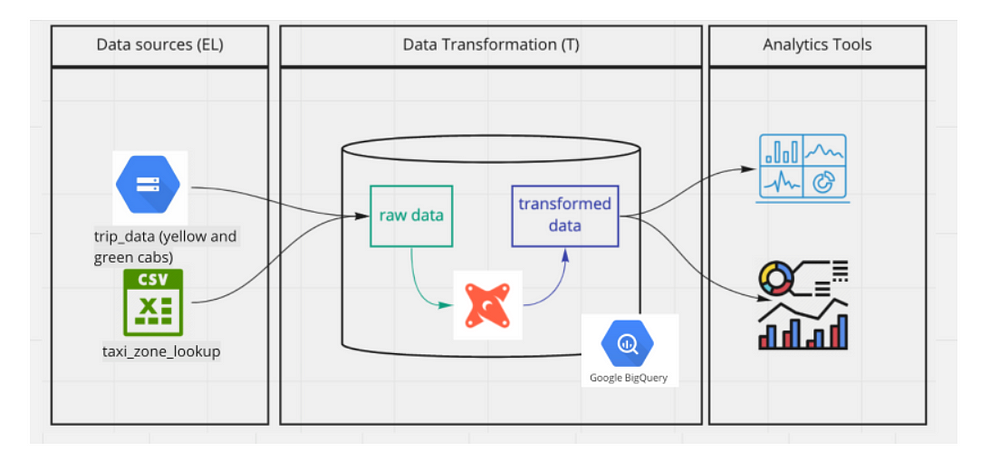
DBT stands for Data Building Tool. It is an open source tool used in transforming data: The T in ELT. It is mostly used by Analytics Engineers (a term I learnt this week. ). The work of the data engineers is to build the data pipelines, the analytics engineers work is to transform the data in the warehouse into forms that Data Analysts or Business Intelligence team can readily consume.
DBT’s work is to help you write code (sql select statements), get the code written and execute the code inside your data warehouse. It is basically a compiler and runner. It takes the code written and compiles it into raw sql code then run it in the data warehouse.
DBT has 2 components, DBT core which is open source and DBT cloud which is a paid service that one can build in the cloud.
For this week, I decided to work locally so that I can learn the inner workings of DBT.
Setting up DBT locally
- First create a project folder —
mkdir <dirname> - Move to the directory
cd <dirname> - Create Dockerfile using the dockerfile shared by the official dbt git. Since I am only using BigQuery, I have commented Postgres, Redshift and Snowflake. Although you can specify which data warehouse you will be using in docker-compose file.
- Create
docker-compose.ymland add the code below:
version: '3'
services:
  dbt-bq: #name of the service
    build:
      context: . #which docker file to use
      target: dbt-bigquery #which plugin to install in addition to dbt-core
    image: dbt/bigquery
    volumes:
      - .:/usr/app #persisting dbt data
      - ~/.dbt:/root/.dbt #location of profiles.yml
      - ~/.google/credentials/google_credentials.json:/.google/credentials/google_credentials.json
    network_mode: host
- Run
docker compose build - Run
docker compose run dbt-bq init
– dbt-bq is the name given to the service in the docker-compose
– The questions asked will be used to generate the profile.yml file
– Project name:taxi_ride_ny
– data ware house is BigQuery. It will be the only one listed
– dataset name can thetaxi_dbt_stagingthis is for dev environment
– Choose the location of your project in BigQuery. Data is not moved from one location to the other. Here you can select the general location, however you will have to write the actual region, in my case I selected EU but changed it toeurope-west6
– select how the authentication will be done. I selected key
– The location of the key file is the one in docker not the one in your machine
– state your project id in GCP
– Threads I used 4
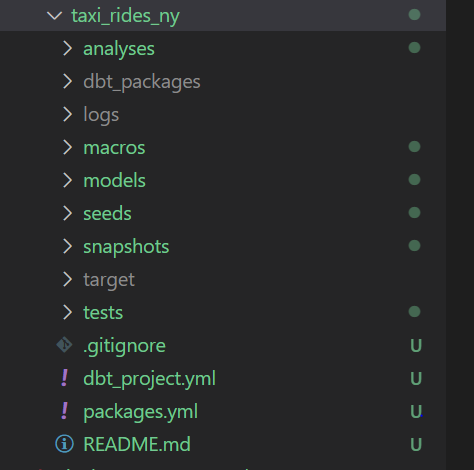
– Timeout I used default 300 - project.yml and other folders will be created. The file structure looks as below. Ignore the packages and target folders and files
- Run
docker compose run — workdir=”/usr/app/dbt/taxi_rides_ny” dbt-bq debug
– Output should beAll checks passed
– if you are using Git Bash usedocker compose run — workdir=”//usr/app/dbt/taxi_rides_ny” dbt-bq debugother ways command will fail
How DBT works
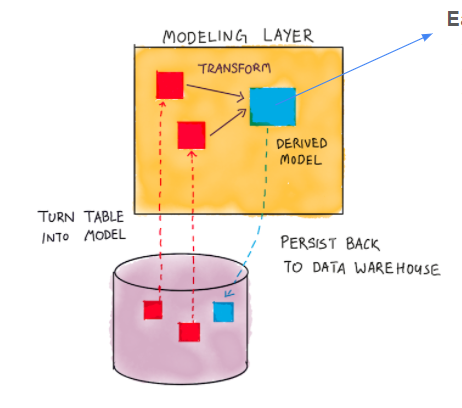
Get data from the data warehouse, transform it into a table or view and store it in the data warehouse. The model is an sql file that will be compiled into raw sql code and run.
docker compose run --workdir=”/usr/app/dbt/taxi_rides_ny” dbt-bq run
DBT Models
All models are stored in the models folder. An sql file consists of materializations — a build strategy for your query. It can be table, view, incremental ( The model is initially built as a table, and in subsequent runs, DBT inserts new rows and updates changed rows in the table) and ephemeral (The model is not directly built in the database, but is instead pulled into dependent models as common table expressions)
{{config(materialized = 'view')}}
Select * from staging.source_table
When compiled the above will be
create view myschema.my_model as (
select * from staging.source_table
)# my_model is the name of the sql file. in this case it will be my_model.sql
The models can be organized into staging model and the core models. Staging models are used to transform the existing table by either renaming columns, changing data types, mapping categorical data to their descriptions etc. The core models can be fact table — measurements or metrics, mostly business processes or dimensional tables — mostly business entities, context to the business processes such as product dimension which will be under sales facts.
The source is declared in a schema.yml file. This is the name of the tables in your data warehouse. An example of a schema.yml will be:
version: 2
sources:
  - name: staging
    database: <database name in bigquery>
    schema: <dataset name in bigquery>
    tables:
      - name: green_tripdata
      - name: yellow_tripdata
The above sql code could be written as follows:
{{config(materialized = 'view')}}
Select * from {{source('staging','green_tripdata')}}
The data can also be from a csv file. In this case the csv file will be put in the seeds folder. The seeds are for small files that do not change often. You will benefit from version control when the csv is in the seed. To add it , run docker compose run --workdir=”/usr/app/dbt/taxi_rides_ny” dbt-bq seed
To reference the file in your model, you use the ref macro as shown below:
{{config(materialized = 'view')}}
Select * from {{ref('taxi_zone_lookup')}}
There are also macros that help in writing the sql. One can write functions or have environment variables. The macros are in the macro folder. The name of the macro file does not need to be the same as that of the macro. An example of a macro is below:
{% macro get_payment_type_description(payment_type) -%}
    case {{payment_type}}
      when 1 then 'Credit card'
      when 2 then 'Cash'
      when 3 then 'No charge'
      when 4 then 'Dispute'
      when 5 then 'Unknown'
      when 6 then 'Voided trip'
   end
{%- endmacro %}
This function can be called in a model as shown below:
{{get_payment_type_description('payment_type')}} as payment_type_description
DBT has packages — which are similar to libraries in programming languages. List of packages can be found in DBT hub. The packages are imported in the packages.yml and they are imported to the project using dbt deps . An example of the yml file is as below:
packages:
  - package: dbt-labs/dbt_utils
  version: 0.8.0
Finally there are variables. They can be local variables in the model or global variables declared in the project.yml. The variables can be declared as below:
# Global variable in the project.yml
vars:
  payment_type_values: [1, 2, 3, 4, 5, 6]
# local variable in the model.sql
{% if var('is_test_run',default=true)%}
   limit 100
{% endif %}
DBT Test and Documentation
One can create unit test in DBT. This is done in the schema.yml. There are basic tests that are provided by DBT but one can also create their own custom test. The test created by DBT are:
- Unique
- Not Null
- Accepted values
- A foreign key to another table
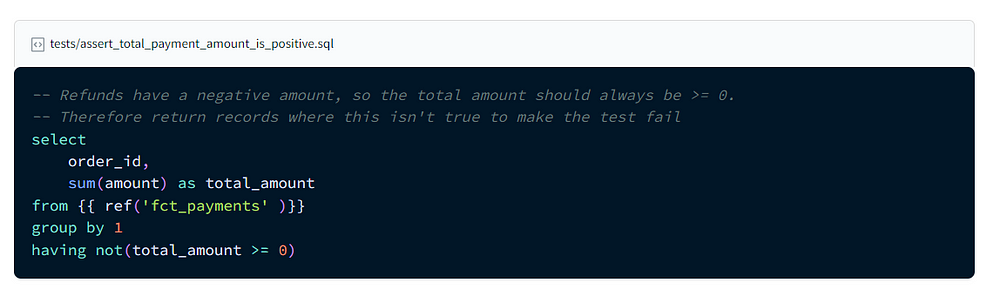
Custom tests are in the test folder and the are sql files. One can also use dbt packages. To run the test, use this command docker compose run --workdir=”/usr/app/dbt/taxi_rides_ny” dbt-bq test
You will get the test results, if
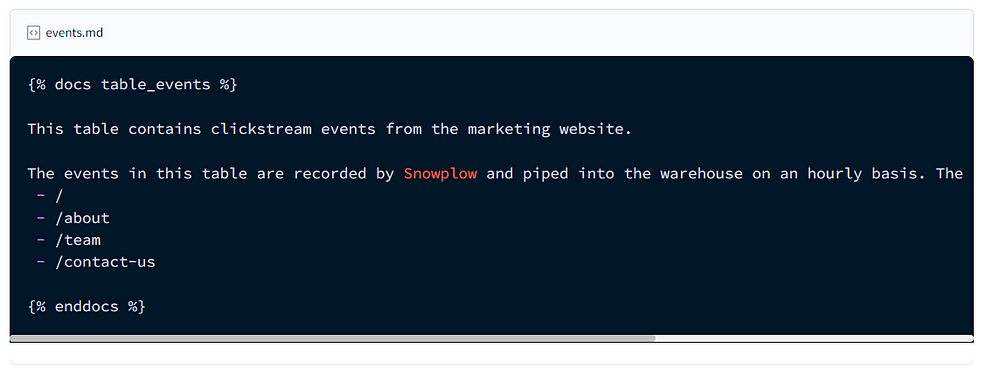
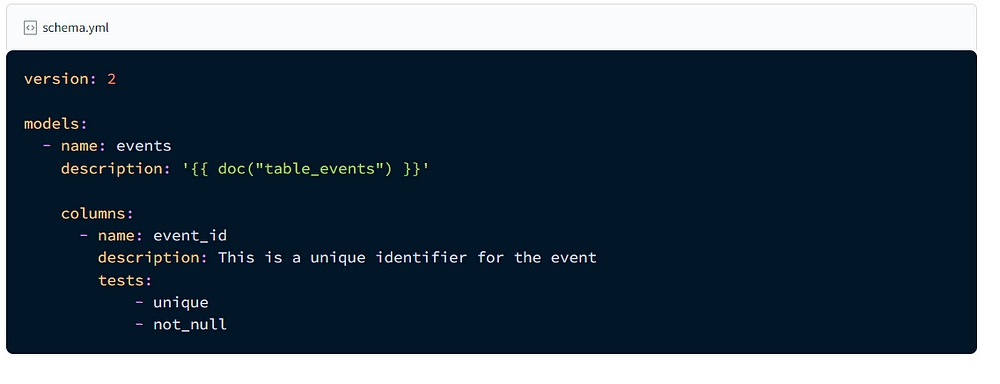
Documentation is done in the schema.yml as description. They can also be put in doc blocks as markdowns. The blocks need to have unique names and are called in the schema. To generate the docs, run this command docker compose run --workdir=”/usr/app/dbt/taxi_rides_ny” dbt-bq docs generate . To create files to put in local website, run docker compose run --workdir=”/usr/app/dbt/taxi_rides_ny” dbt-bq docs serve which will generate .json files.
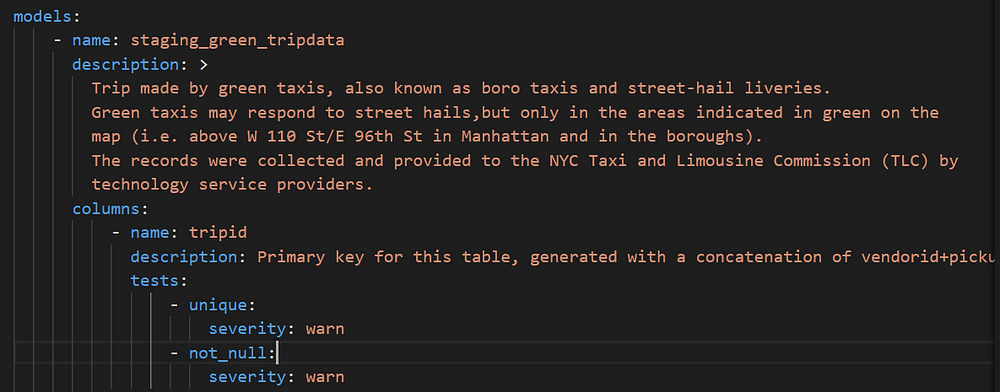
An example of the test and documentation in the schema is as follows:
The end result of the project will look like this

DBT deployment
In the profile.yml, will need to add a new target called prod. This is to separate the dev and prod environments ant to make sure that transformed data that is consumed by Data Analysts or BI is not affected. The new profile.yml will be as follows.
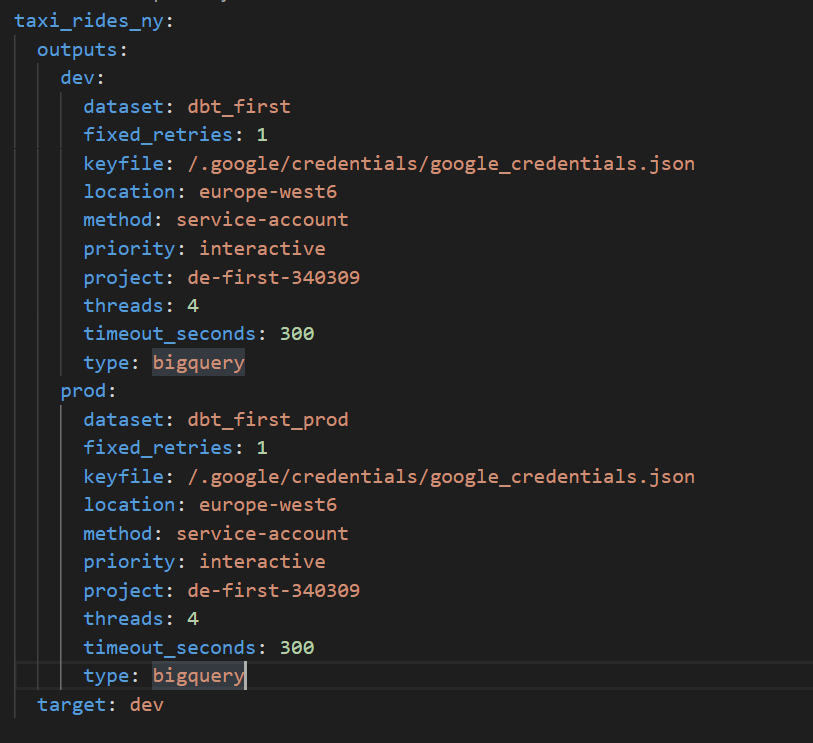
You will notice that the datasets are different. To build project using prod as target, run docker compose run --workdir=”/usr/app/dbt/taxi_rides_ny” dbt-bq build -t prod --var ‘is_test_run: false’
NOTE: Got an error (error message: Parquet column ‘ehail_fee’ has type DOUBLE which does not match the target cpp_type INT64.) because of the ehail_fee column in green_tripdata. Had to set the values to 0 since the values are 0 and null cast(0 as numeric) as ehail_fee.
DBT in production is just running the jobs on a schedule. This can be done using crons, airflow, automation server such as codedeploy or Gitlab CI/CD.
When setting up the schedule, one should consider the following:
- The complexity involved in creating a new DBT job, or editing an existing one.
- Setting up notifications if a step within your job returns an error code (e.g. a model cannot be built, or a test fails).
- Accessing logs to help debug any issues.
- Pulling the latest version of your git repo before running DBT (i.e. continuous deployment).
- Running your DBT project before merging code into master (i.e. continuous integration).
- Allowing access for team members that need to collaborate on your DBT project.
Once the data is transformed, you can now visualize the reports using tools such as datastudio, metabase, powerbi and dash among others.
TODO
- I would like to explore working with transactional data.
- Look deeper into the data modelling
- Deployment DBT using airflow or CI/CD
References
- https://docs.google.com/presentation/d/1xSll_jv0T8JF4rYZvLHfkJXYqUjPtThA/edit#slide=id.g1112932a308_0_193
- https://github.com/DataTalksClub/data-engineering-zoomcamp/tree/main/week_4_analytics_engineering
- https://docs.getdbt.com/docs/building-a-dbt-project/projects
- https://docs.getdbt.com/docs/building-a-dbt-project/tests
- https://docs.getdbt.com/docs/building-a-dbt-project/documentation