
Development and Operations (DevOps) is a management culture that improves the IT service delivery agility on the basis of communication, collaboration and integration. It has become very critical to shorten the time to production for software as well as accepting change requests frequently. This requires a flexible method such as agile software development approach which can accelerate time to market and improve code quality.
In this blog series I will introduce you to Jenkins and how it can be used to automate your business processes (continuous deployment). I will do this in three phases;
1. Part 1 – Introduction to DevOps and Jenkins setup.
2. part 2 – Jenkins for docker and kubernetes. Creating a pipeline for continuous deployment in Jenkins.
3. part 3 – Optimizing DevOps in an organization -Tools and techniques.
What is Jenkins?
Jenkins is a powerful application that allows continuous integration and continuous delivery of projects, regardless of the platform you are working on. It is a free source that can handle any kind of build or continuous integration. You can integrate Jenkins with a number of testing and deployment technologies. This means that you can use Jenkins to build and test your software projects continuously and push them to production.
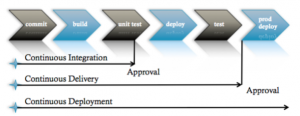
Continuous Integration (CI)– Continuous integration is a development practice that requires developers to integrate code into a shared repository several times a day. It is a process of running your tests on a non-developer (say testers) machine automatically when someone pushes new code into the source repository. This can be at GitHub level
Continuous Delivery (CD)– Continuous Delivery is similar to Continuous Integration. You are building a product that can be released to production at any time. Continuous Delivery requires building, testing, and releasing faster and more frequently. This is at the staging environment or the pre-production environment.
Continuous Deployment (CD) – Continuous deployment is a strategy for software releases wherein any code commit that passes the automated testing phase is automatically released into the production environment, making changes that are visible to the software’s users.
Below is a figure showing the different levels of Dev Ops
Advantages of Jenkins
1. It is open source and it is user-friendly, easy to install and does not require additional installations or components meaning it is also free.
2. Easily Configurable. Jenkins can be easily modified and extended. It deploys code instantly, generates test reports. Jenkins can be configured according to the requirements for continuous integrations and continuous delivery.
3. Platform Independent. Jenkins is available for all platforms and different operating systems, whether OS X, Windows or Linux.
4. Rich Plugin ecosystem. The extensive pool of plugins makes Jenkins flexible and allows building, deploying and automating across various platforms.
5. Easy support. Because it is open source and widely used, there is no shortage of support from large online communities of agile teams.
6. Developers write the tests to detect the errors of their code as soon as possible. So the developers don’t waste time on large-scale error-ridden integrations.
Setting up Jenkins
Prerequisite
1. Linux server/ a PC running linux
2. Internet connection
3. Basic linux skills
Procedure
1. Install openjdk-8 and maven
sudo apt-get update
sudo apt-get install openjdk-8-jdk
sudo apt-get install maven
2. Install language package
sudo apt-get install language-pack-en
3. Install Jenkins
wget -q -O - https://pkg.jenkins.io/debian/jenkins.io.key | sudo apt-key add - echo deb https://pkg.jenkins.io/debian-stable binary/ | sudo tee /etc/apt/sources.list.d/jenkins.list
sudo apt-get update
sudo apt-get install jenkins
4. Install Apache2
sudo apt-get install apache2
sudo a2enmod proxy
sudo a2enmod proxy_http
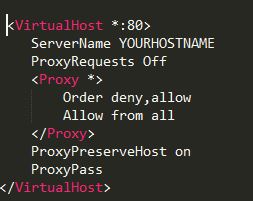
5. Edit jenkins configuration file and specify the port, servername as well as other security configurations.
/etc/apache2/sites-available/jenkins.conf
6. Enable jenkins.conf file and restart apache2
sudo a2ensite jenkins
sudo service apache2 reload
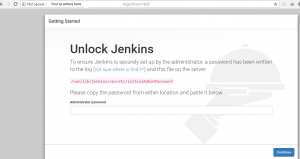
7. Visit the browser to finish th setup by entering the IP of the server and the port. You might want to use sudo to open the file containing the password.
8. Install the most used dev plugins when prompted to do so.
9. Now you have Jenkins installed and running on your ubuntu machine. Next time we will at the process of creating a pipeline to build Java projects from your Github repository with maven, test the code, create docker images and push them to docker hub
Have fun and watch this space for the second phase of this project!