
With the many benefits that the cloud offers these days, you may find yourself in a situation where you want to extend your local infrastructure to AWS to take advantage of some of those benefits. These include the Relational Database Service (for easy database management), auto-scaling groups to handle increased capacity dynamically and containerized applications. While there is a lot of vendor-specific documentation on how to do this with hardware equipment (i.e. at router level), there isn’t comprehensive documentation for the client with a single server hosted on a public IP address looking to extend their infrastructure cheaply…until now.
This tutorial will walk you through using a publicly hosted Linux server/VPS as a customer gateway to implement an AWS VPC with Public and Private Subnets and AWS Managed VPN Access (Scenario 3) based on the tutorial in the link with a few modifications. Such modifications include having private subnets in two availability zones (a requirement to use RDS) and enabling internet access for the hosts in the private subnet via a NAT gateway (for software installation and security updates). The goal of this setup is this with the modifications in handwriting: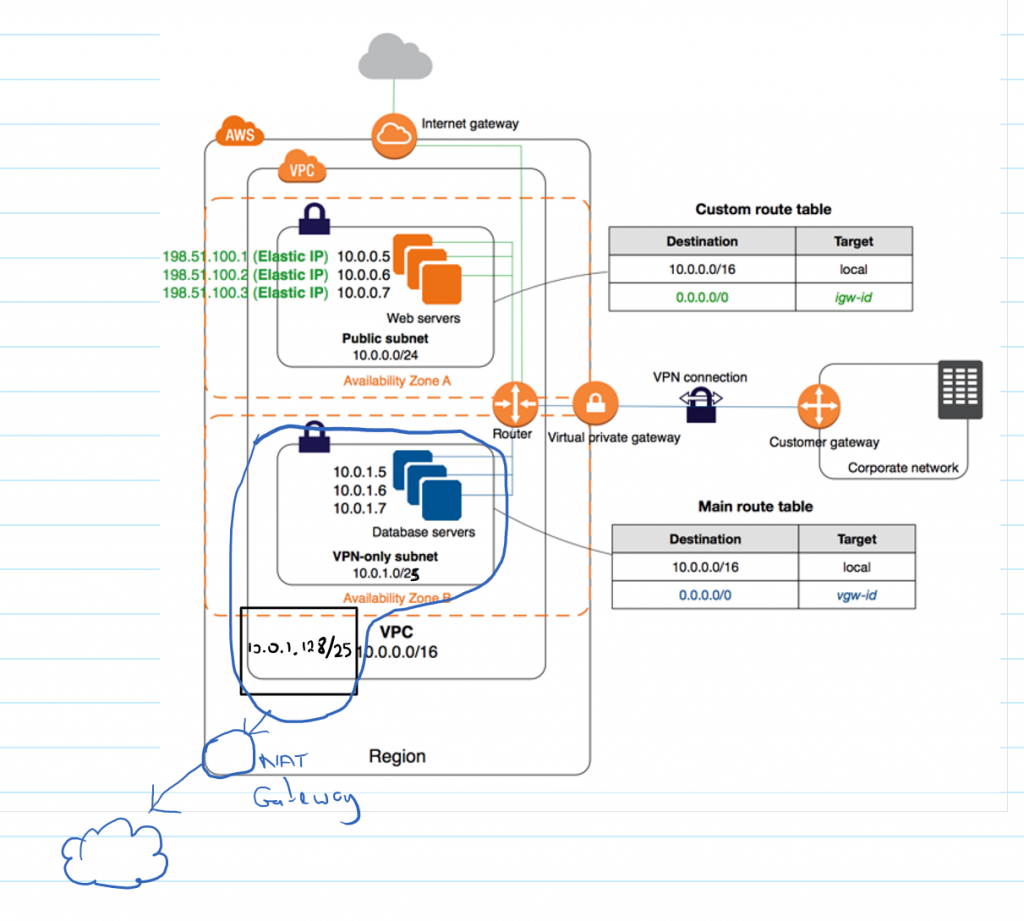
Amazon VPC with Linux Server/VPSRequirements to follow this tutorial are:
- Publicly hosted Linux host (Ubuntu 14.04 for this example) with root access to act as the customer gateway. The host may be behind a firewall (as is the case with this setup) and those considerations will be highlighted.
- AWS account with permissions to create a new VPC.
The VPC Setup
Start by logging onto the console and selecting VPC.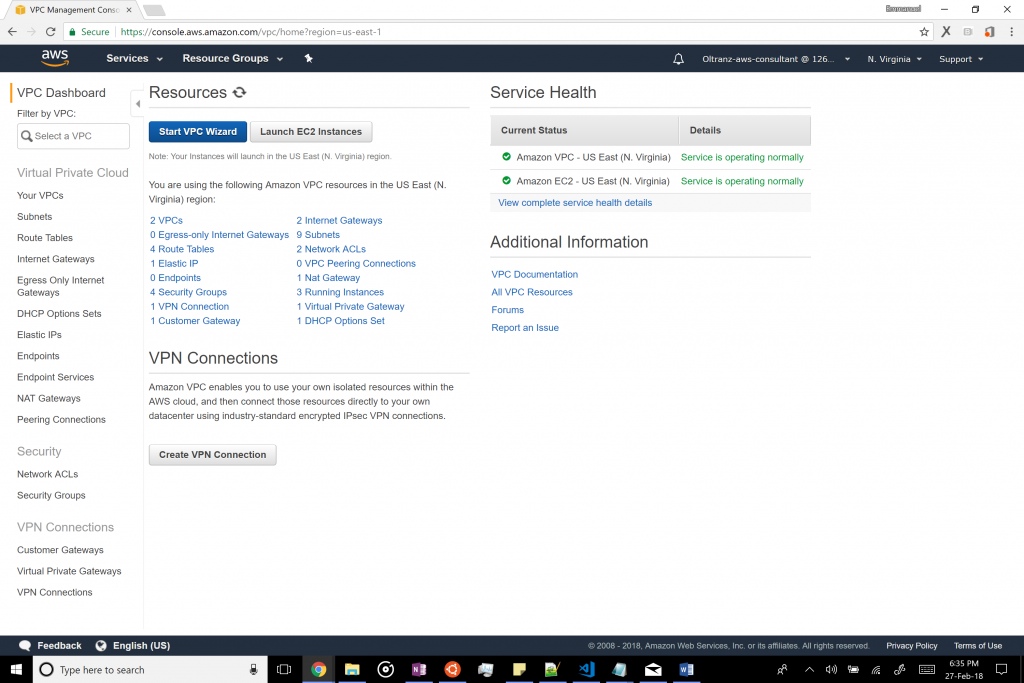
Next, start the VPC wizard and select scenario 3.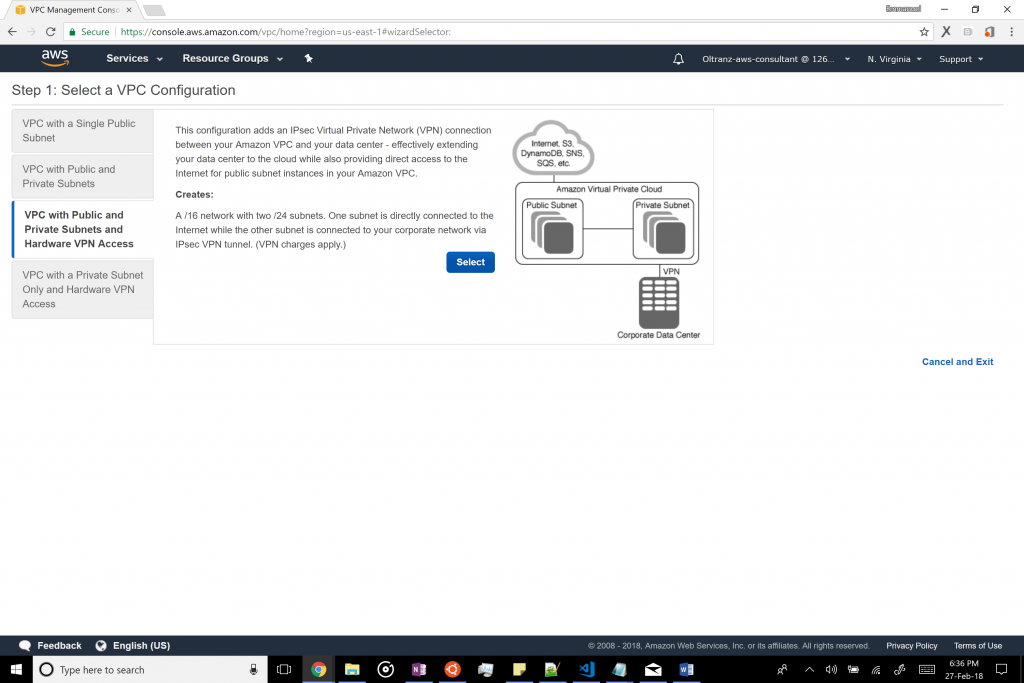
Change the names of the VPC, public subnet and private subnet as desired. Also change the availability zone to the one with the lowest ping to the region of your server and balance that result with services available in that region (in our case, us-east-1a). Finally, change the private subnet’s CIDR from /24 to /25. This will be to support another availability zone in the remaining private IPs. We will create the second subnet later.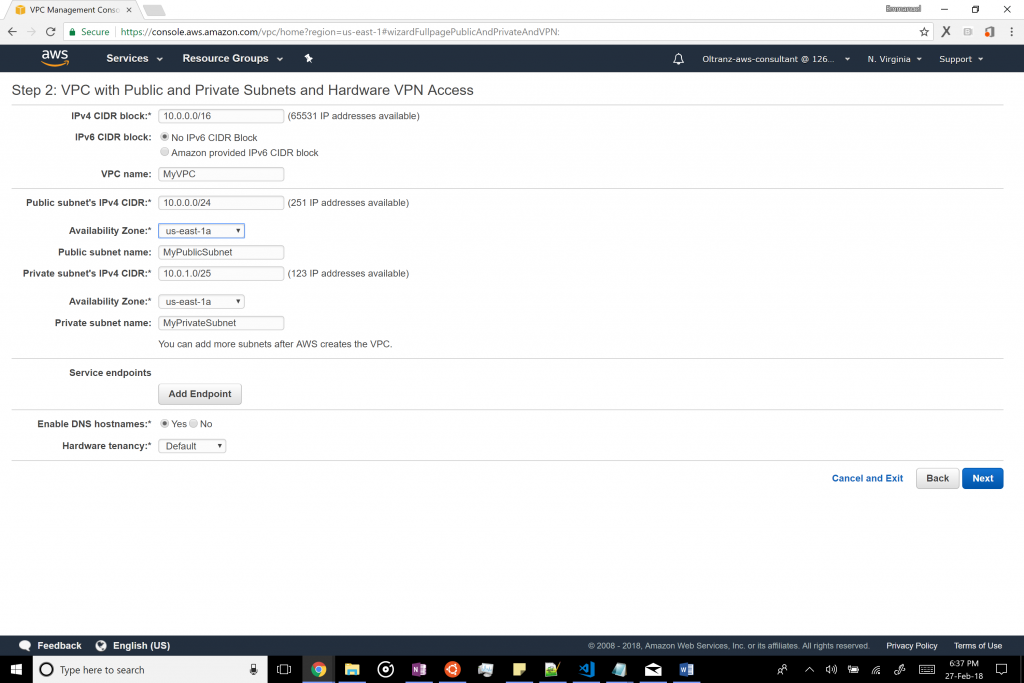
Next, input the IP address of your gateway (e.g. 1.1.1.1), the name of the gateway and the VPN, set the routing type as BGP and create the VPC. The process will a few minutes so keep the page active and wait patiently.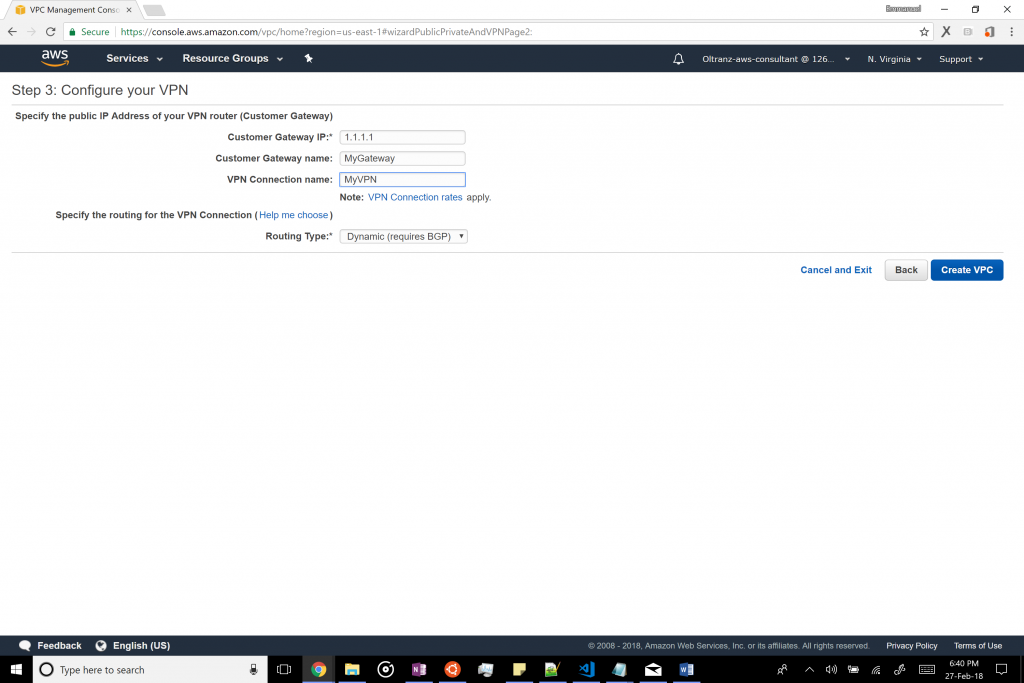
Next, create another private subnet in another availability zone. This is critical to running RDS. To do this, select “Subnets” from the left pane of the VPC Dashboard and click “Create Subnet”. Name the subnet appropriately and select the newly created VPC. Then select the second availability zone you wish to use (in this case, us-east-1b) and set the CIDR block as 10.0.1.128/25. Click create.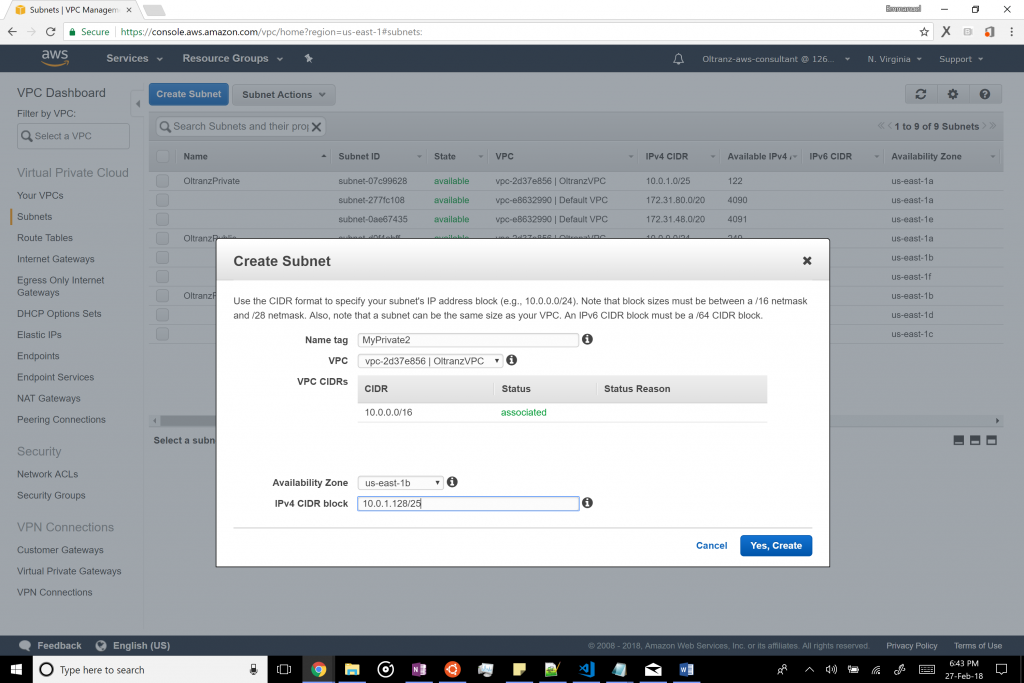
The next step is to set up the VPN connection to the local gateway to make it a part of the VPC. To do this, select VPN connections from the left pane, select the recently created VPN and click on “Download Configuration”. Next, select “Generic” as the vendor and platform (since this is a vendor agnostic tutorial) and download the configuration.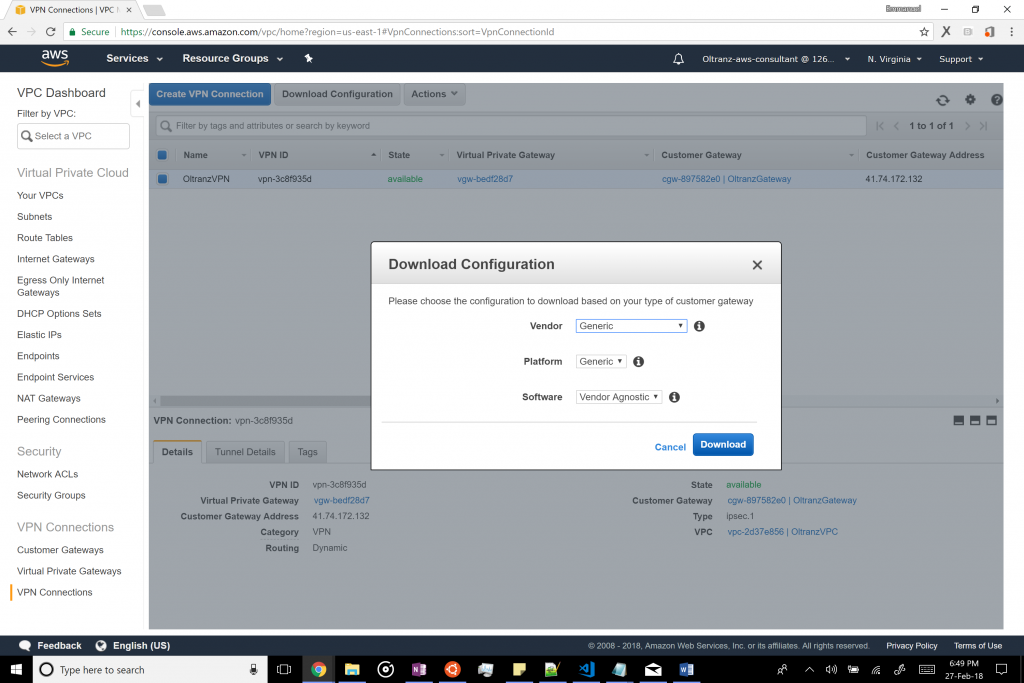
Tunnel 1
- Pre-Shared Key : AAAA
Outside IP Addresses:
 - Customer Gateway : 1.1.1.1
 - Virtual Private Gateway : 2.2.2.2
Inside IP Addresses
 - Customer Gateway : 169.254.45.214/30
 - Virtual Private Gateway : 169.254.45.213/30
BGP Configuration Options:
 - Customer Gateway ASN : 65000
 - Virtual Private Gateway ASN : 7224
 - Neighbor IP Address : 169.254.45.213


Tunnel 2
- Pre-Shared Key : BBBB
Outside IP Addresses:
 - Customer Gateway : 1.1.1.1
 - Virtual Private Gateway : 3.3.3.3
Inside IP Addresses
 - Customer Gateway : 169.254.47.74/30
 - Virtual Private Gateway : 169.254.47.73/30
BGP Configuration Options:
 - Customer Gateway ASN : 65000
 - Virtual Private Gateway ASN : 7224
 - Neighbor IP Address : 169.254.47.73
The Host Setup
Next, log on to your Ubuntu 14.04 customer gateway as root and begin by installing a few packages:
apt-get update
apt-get install ipsec-tools racoon quagga
Next, we shall edit /etc/racoon/psk.txt and add our secret/pre-shared key to the file.
2.2.2.2 AAAA
3.3.3.3 BBBB
Next we shall add the following to /etc/racoon/racoon.conf as follows:
log notify;
path pre_shared_key "/etc/racoon/psk.txt";
path certificate "/etc/racoon/certs";
remote 2.2.2.2 {
 exchange_mode main;
 lifetime time 28800 seconds;
 proposal {
 encryption_algorithm aes128;
 hash_algorithm sha1;
 authentication_method pre_shared_key;
 dh_group 2;
 }
 generate_policy off;
}

remote 3.3.3.3 {
 exchange_mode main;
 lifetime time 28800 seconds;
 proposal {
 encryption_algorithm aes128;
 hash_algorithm sha1;
 authentication_method pre_shared_key;
 dh_group 2;
 }
 generate_policy off;
}

sainfo address 169.254.45.214/30 any address 169.254.45.213/30 any {
 pfs_group 2;
 lifetime time 3600 seconds;
 encryption_algorithm aes128;
 authentication_algorithm hmac_sha1;
 compression_algorithm deflate;
}

sainfo address 169.254.47.74/30 any address 169.254.47.73/30 any {
 pfs_group 2;
 lifetime time 3600 seconds;
 encryption_algorithm aes128;
 authentication_algorithm hmac_sha1;
 compression_algorithm deflate;
}
The next step is to edit /etc/ipsec-tools.conf as follows:
flush;
spdflush;
spdadd 169.254.45.214/30 169.254.45.213/30 any -P out ipsec
esp/tunnel/1.1.1.1-2.2.2.2/require;
spdadd 169.254.45.213/30 169.254.45.214/30 any -P in ipsec
esp/tunnel/2.2.2.2-1.1.1.1/require;
spdadd 169.254.47.74/30 169.254.47.73/30 any -P out ipsec
esp/tunnel/1.1.1.1-3.3.3.3/require;
spdadd 169.254.47.73/30 169.254.47.74/30 any -P in ipsec
esp/tunnel/3.3.3.3-1.1.1.1/require;
spdadd 169.254.45.214/30 10.0.0.0/16 any -P out ipsec
esp/tunnel/1.1.1.1-2.2.2.2/require;
spdadd 10.0.0.0/16 169.254.45.214/30 any -P in ipsec
esp/tunnel/2.2.2.2-1.1.1.1/require;
spdadd 169.254.47.74/30 10.0.0.0/16 any -P out ipsec
esp/tunnel/1.1.1.1-3.3.3.3/require;
spdadd 10.0.0.0/16 169.254.47.74/30 any -P in ipsec
esp/tunnel/3.3.3.3-1.1.1.1/require;
Note that if the host was behind a firewall and had an internal IP (e.g. 10.171.1.50) then that internal IP would be used for outbound traffic and the public IP for inbound traffic. For example:
esp/tunnel/10.171.1.50-2.2.2.2/require; //for outbound traffic
and
esp/tunnel/2.2.2.2-1.1.1.1/require; //for inbound traffic
Since the host’s internal and external IP are the same, then it is the same across the board.
Next, we will create the file /etc/quagga/bgpd.conf and edit it as follows:
hostname ec2-vpn
password SecurePass
enable password SecurePass
!
log file /var/log/quagga/bgpd
!debug bgp events
!debug bgp zebra
debug bgp updates
!
router bgp 65000
bgp router-id 1.1.1.1
network 169.254.45.214/30
network 169.254.47.74/30
network 0.0.0.0/0
!
! aws tunnel #1 neighbour
neighbor 169.254.45.213 remote-as 7224
!
! aws tunnel #2 neighbour
neighbor 169.254.47.73 remote-as 7224
!
line vty
“SecurePass” can be anything the user wants it to be. The key details to change are in the 3rd to 5th blocks.
Next, we shall edit /etc/quagga/zebra.conf as follows using the “SecurePass” defined earlier. Also note the interface that your host uses to connect to the internet (in my case, eth0).
hostname ec2-vpn
password SecurePass
enable password SecurePass
!
! list interfaces
interface eth0
interface lo
!
line vty
Next, we shall edit /etc/quagga/daemons and change the following existing variables:
zebra=yes
bgpd=yes
Finally, we shall run the following commands to set the appropriate permissions for the above files:
chmod 640 /etc/quagga/bgpd.conf
chmod 640 /etc/quagga/zebra.conf
chmod 640 /etc/quagga/debian.conf
chown quagga.quaggavty /etc/quagga/*.conf
The last step is to set up our IP on the appropriate (in my case, eth0) interface. This will need to be redone in case of a server reboot or you can make it permanent.
ip a a 169.254.45.214/30 dev eth0
ip a a 169.254.47.74/30 dev eth0
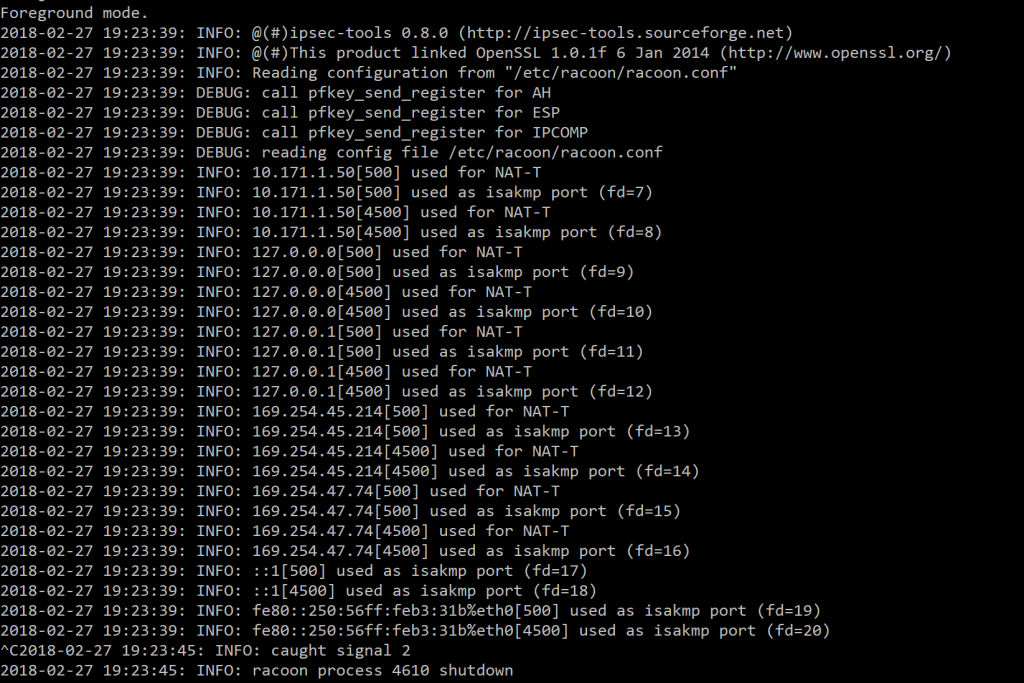
Finally, we can degub racoon by running it in the foreground and checking for syntax errors. If the output looks like below, it means it’s good to go. If not, refer to the error messages for potential errors such as syntax errors in one of the configuration files.
racoon -d -v -F -f /etc/racoon/racoon.conf
Finally restart all services using these commands:
/etc/init.d/racoon restart
/etc/init.d/setkey restart
/etc/init.d/quagga restart
To be sure that the connection is working, ping the two neighbor IP addresses for feedback. Also, create EC2 instances in the private subnet and attempt to SSH and PING them to be sure.
Adding Internet Connectivity to the Hosts in the Private Subnet
You will notice that the private subnets have no access to the internet. While this is desirable for security purposes, there may be a need to run updates on the hosts or download other configuration files. To add internet connectivity for this purpose, we will setup a NAT gateway as follows:
Go back to the VPC dashboard and “Create NAT Gateway” in the “NAT Gateways” tab.
In this window, we will select the Public subnet of our newly created VPC as the subnet and create a new elastic IP for the Elastic IP Allocation ID.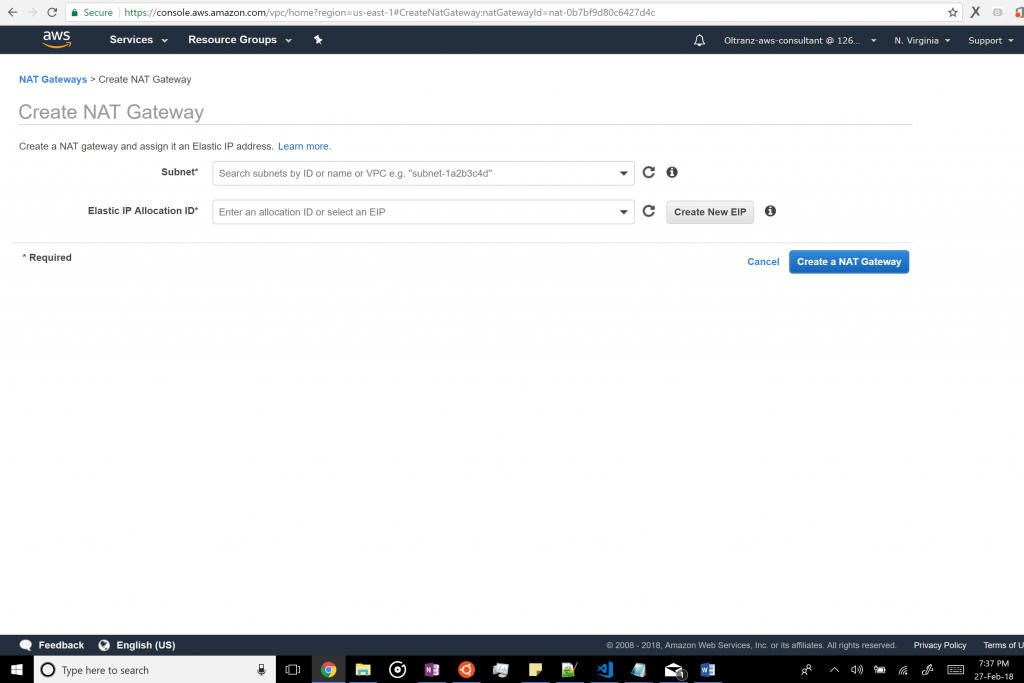
Once done, we shall create a new route table in the “Route Tables” tab within our VPC.
Next, we shall modify the route table so that all public facing traffic (i.e. 0.0.0.0/0) goes to the NAT gateway we just created. Everything else should be copied from the route table of the Private subnet of the VPC.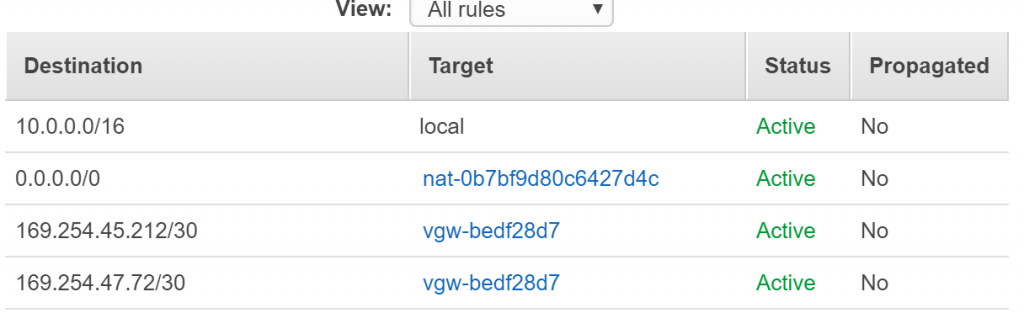
Finally, in the “Subnets” tab, we should change the route table from the old one to the newly created one.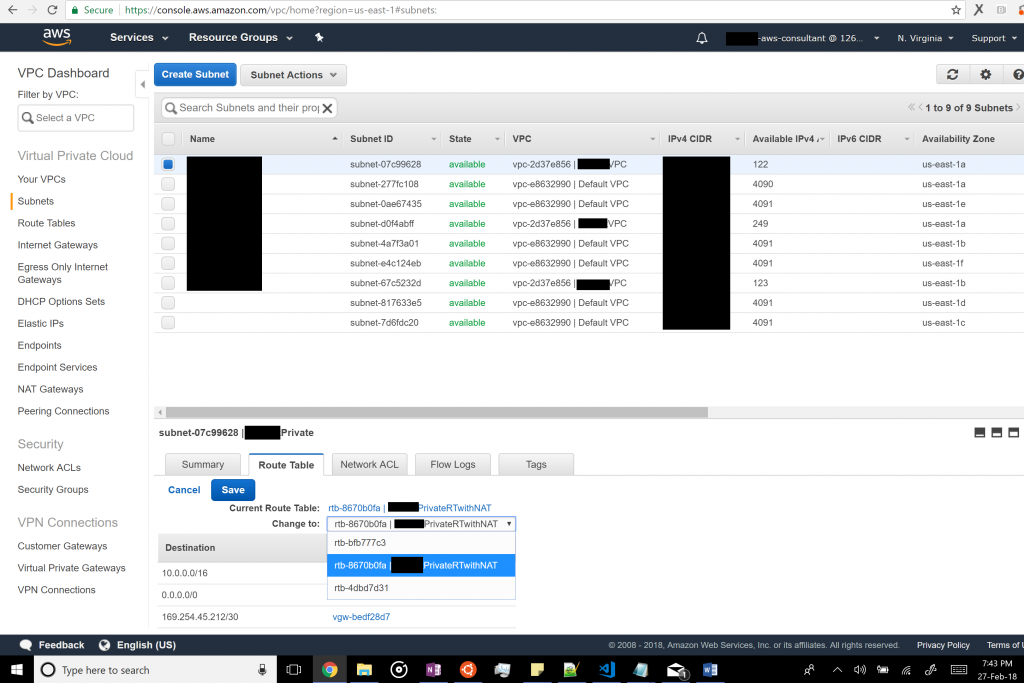
Finally, test the internet connectivity by SSH-ing into a private instance (either from the public subnet or from the customer gateway) and pinging 8.8.8.8 or amazon.com. You should be able to reach it.
One Reply to “Connecting a Linux Server/VPS to AWS’ Secure Virtual Private Cloud”
Comments are closed.