
It’s all about security and data. Are you the type of person who connects to public WiFis every time you can get access to one? (We all enjoy high speed internet especially at airports, hotels cafe etc.)?
Do you ever get a warning that your data might be at risk if you connect to that network, but you still go ahead and connect? This blog is meant for you, to help you secure your network, data and any information your share online especially when connected to public WIFI which can easily be tapped by an attacker.
What is UFW?
UFW stands for uncomplicated firewall, it’s a simple firewall that one can configure in their machines. It’s the simpler version of Iptables. One does not require much knowledge of how the firewall operates. By following the steps below, you will be able to create a firewall in your laptop to protect your machine from external attacks when using public Wi-Fi or surfing the internet when not behind a firewall.
Requirements:
The configurations are only applicable on a Linux machine.You need to have the knowledge of Linux terminal and basic commands in Linux.You need to be root to run this commands (sudo).In this blog, I will be configuring my firewall in the server since I run windows locally.
Step 1: Configuring and Installation of UFW
It involves checking whether UFW is enabled in your machine. Key in the following commands to check.
Sudo UFW status
If you see the screen below, it means your machine does not have UFW installed.

Hence you need to install using: Sudo apt-get install UFW
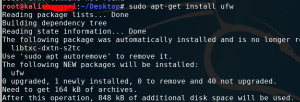
After installing, and running the “Sudo ufw status”, the UFW will be inactive.
![]()
You need to run one more command. Sudo UFW enable, which enables the firewall and one can proceed to configure the rules they want.

Step 2: Setting up the rules
Major rules in the UFW can fall in the three categories below
- Allow in
- Deny in
- Reject in
One major key thing is that you want to allow outgoing and incoming connections through some of these ports so as not to disrupt how your machine works. Such important ports include:
- Tcp port 22
- Port 80
- Port 8080
Run the following commands to set them up:
“Sudo ufw allow 22”
“Sudo ufw allow 80”
“Sudo ufw allow 8080”
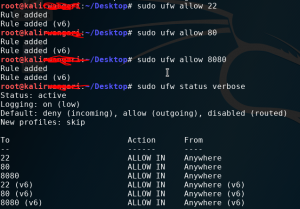
Looking at the rules, our firewall now allows incoming connection from anywhere to the three ports specified.
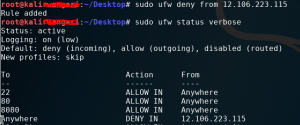
Step 3: Setting restrictions on ports and IP address
Once you have your own firewall, one should be aware of the blacklisted IPs. These are mostly the known attackers or a blacklisted IPs that are known to be malicious. One can configure this by denying or rejecting their connection. An example of such IP is 12.106.223.115, block so that the IP cannot access any port.
“Sudo ufw deny from 12.106.223.115”
Basically, following the above steps, one can allow connection to just a single port such as
“sudo ufw allow from 134.56.67.89 to any port 23” this means we have allowed connection from 134.56.67.89 to our machine only through port 23.Another option can be to block the connection from a specific IP to a specific network interface:
“sudo ufw reject in on eth0 from 14.14.14.45”
I believe this overview covers much of what one can achieve with UFW, its all about knowing what you want to achieve and then setting your rules explicitly.
Have fun configuring the firewall ?